Sunday, January 30, 2011

Paper Source Sunday - Octopus Nails!

Hi everyone! I wanted to let you know about a NEW WEEKLY SEGMENT i'll be doing!! :) I have been super inspired by paper source patterns lately. I absolutely love this store (and not because it's on the way to Georgetown Cupcake). Their patterns are gorgeous and look way better in person and really make me want to buy them all! But instead, I'm going to do my nails based on them. The first one i'm doing is inspired by one of their wrapping paper patterns: Octopuses! (or octopodes.. if you will :P)

You can see it here:
http://www.paper-source.com/cgi-bin/paper/item/Octopus-Wrapping-Paper/3106.001/44364150.html


Step 1) Apply a base coat - (I used Seche Vite base coat)

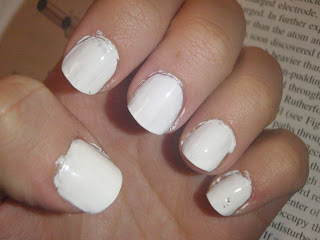
Step 2) Paint your nails white with 2 to 3 coats of white nail polish. (I used a white by OPI). P.s. I messed up the pinky a bit (hit it on something), but its okay because we'll cover that up later.

Step 3) Pick out the colors you want to use. The pattern had orange, red, and green, but I thought a pink would look good.

Step 4) Blot a color onto a piece of scrap paper and use a large dotter tool to apply random dots on the nail. Being a broke college student, I didn't have a large dotter with me, so I decided to be resourceful and use the bottom of a pencil.


Step 5) Use a small paintbrush to begin painting out the tentacles, beginning from the bottom center of the circle-blob, and curling out.

Step 6) Continue adding tentacles - use other colors and the pencil-dotting technique to create random octopuses. 

Step 7) Use a small dotter tool (or the sharp tip of your pencil) to add two white dots for eyes.

Step 8) Look at your nails and the wrapping paper and smile :) 

Have a good week!

Thursday, January 20, 2011

American University Nails

When I first came to college, I painted my nails with the American University logo. This attracted attention from a lot of people. In fact, quickly became known as "the girl with the AU nails". When people would notice, they would remark to me "Oh! You're the girl with the AU nails! Someone told me about you!". Yes, I was that girl during orientation and welcome week, and now you can be that girl (or guy - I don't judge) too. Today I'll share with you the secret of how to put that logo on your very own nails.

Step 1) Apply a base coat. (I used Seche Vite)

Step 2) Cover the right half of your nail with a red polish. (I used OPI Red Hot Ayers Rock)

Step 3) Fill the other half of your nail with a navy blue nail polish. (I used Funky Fingernails Jewel tone Blue - which I bought from Five Below - 3 for $5!)

Step 4) Using a white striper nail polish or striper brush dipped in white nail polish, start from the center and make a line outward to begin shaping the letter "A".

Step 5) Repeat this on the other side.

Step 6) Following that center line where the red and blue intersect, create a white line from the center of the "A" toward the bottom of your nail.

Step 7) On the right side of the design, make a line parallel to the one on the divider line.

Step 8) Connect the two parallel lines to make a "U".

Step 9) Connect the U and the A with a line right above the middle line.

Step 10) Create another line at the other tip of the "U" on the same plane and with the same width.

Step 11) Add "feet" to the "A" like you did with the "U"

Step 12) Add topcoat

And you're done! I hope you enjoyed this tutorial and extend your school spirit all the way down to your nails!


Thursday, January 6, 2011

Fifth Element Inspired Nails


Remember that 90’s movie with Bruce Willis and a half-naked, blue-eyed, human-looking alien? Well guess what was just on TV!  And guess who made a nail tutorial. If you answered: Fifth Element and me then – Ding! Ding! Ding! We have a winner!

And here’s your prize:
I was inspired by the extra-terrestrial feel of the movie and of the prominence of the color blue. Thus, I give you – kind-of - Fifth Element Inspired nails.


P.s. Here's my consolation:
Spending way too much time on a video that was recorded at way too high a quality for my computer to handle. As my friend Amanda would say - rookie mistake. :)

Products used:
Sally Hanson Double Duty Base and Top Coat
Funky Fingernails Jeweltone Blue
Orly French Tip Ponte Blanche
Aerie Wish
Small Striper Brush
Dotter Tool
Accetone (Nail Polish Remover)

Khokloma Inspired Nails


Hello everyone! So i'm currently in the middle of editing a new nail art tutorial video (I decided to record it on a higher setting on my camera so the image quality is better so my computer keeps crashing so its taking forever.. yayyy :) good thinking, Una) Anyway, I was looking at the videos on my account and this one is from this time last year. I love my Russian heritage and Khokloma, so I made a nail art tutorial about it! :) I hope you all like it!

Tuesday, January 4, 2011

Purple Eye (Failed) Tutorial

So.. lessons learned. I meant to demonstrate this purple eye tutorial but.. well. It didn't work out. In the video, though, I take you through the brushes and colors I use, so hopefully that'll help a little!

P.S. that dot on my face is makeup. Embarrassing :)


Primer: Too Faced Shadow Insurance
Shadows: BH Costmetics 120 Color Set (3rd Edition), Urban Decay Ransom
Brushes from Ecotools and BH Cosmetics


Sunday, January 2, 2011

My Favorite Things - OPI Bring on the Bling

I absolutely ADORE this nail polish. OPI came out with a new line of colors inspired by the movie Burlesque for the holidays. Ever since I heard about that (the line is fantastic by the way), I went on, essentially a scavenger hunt to find this nail polish. 4 stores and a week of unsuccessful, multi-city attempts later, I decided to order it online. 
I layered it on thicker at the tip like a glittery gradient
This picture doesn't even do the polish justice. It is a wonderful very packed glitter - gold with an almost silver shine. There are specks of blue and purple in there also. It just looks absolutely stunning and is so festive. I'm usually not a sparkly nail polish kind of girl, but I've caught the bug with the Burlesque collection. It just makes me happy to look down at my nails :)

Now, on the downside, the nail polish, like many other glitters, chips really easily. I used Seche Vite Base Coat and OPI topcoat and it still started chipping after 3 days. I was, however, in the middle of many different crafts projects which probably contributed to that. The plus side of glitters are that they dry relatively quickly.

I would definitely recommend it! It's just adorable, and my favorite at the moment!

I ♥ Eyeshadow

So I think the first thing you need when you want to start experimenting with makeup is one of these palettes. Now, you don't need to get a 120 color set, but they make 88 color sets for $18.95. SO many companies sell them, and you can even get them from Ebay. I'm eventually going to try to get a set from there and i'll let you know how the quality compares. I believe the best known companies who sell palettes like this are BH Cosmetics and Coastal Scents.

This is what the 3rd Edition BH Cosmetics
120 Color Palette looks like!
I got the 3rd Edition from BH Cosmetics, which has more dark colors than the first two editions, yet still has great, brightly pigmented colors. I will likely be using this in most of my eyeshadow designs this month.

Its good and bad because I don't have all of the neons I would like to have but I do have some nice shimmery dark colors which will be great for night looks.

 Anyway, I just wanted to post how I've been just messing with the set. It's been a lot of fun and if I get requests, I'll do tutorials :) Let me know!

Silver and Black Night Look

Parakeet Eyes


Hello 2011!

Hello 2011!
Its the new year!
Its time to party and start fresh!
Its the biggest Russian holiday!
Its when people resolve to get fit and go to the gym 2 weeks!
Well I made a resolution to look cute every day.

I'd say I'm pretty good at doing makeup and doing my nails - which people know me for, but i've started to get a little too comfortable. I rarely do my makeup and I've -yikes- started wearing sweats to class.

No more! I've resolved to stop the madness and to start taking care of my appearance again. I'm going to look cute every day.Because why not always look cute? We all deserve to spend time on ourselves.

I also just got a bunch of new makeup and things I can't wait to review for new year [like I said - Russian holiday] so thats inspired all of this too.

This blog will be devoted to makeup, nails, and fashion trends. There will be lots of tutorials, reviews, links, and all of those fun things. (P.S. companies, feel free to send me things to try out :) )

I also plan on doing more contests and things when I get more followers.

So make sure to follow me on blogspot and we can look our best together!